|
Trimming the tail is accomplished using Thinning Shears as
described and illustrated with photos below.
Don't let this task daunt you, it
isn't that hard, just do a little at a time, over a period of several days,
until you have the effect you desire. The Breed Standard reads that
the tail should just reach the dogs hocks, and though some dogs will
have a slightly longer tail, your goal is to trim the tail to that length
as closely as possible, and still not have the tail look noticeably sculptured.
The Goldens' tail has a rounder, fuller look when groomed, and the triangular
wedge seen on an Irish Setter with a "break" at the base of the tail, is
NOT the look desired. The area at the base of the tail is customarily
not groomed to separate the tail from the feathering on the butt, as is done
with the Setters in particular for the show ring, although on a heavily feathered
dog, some shortening of the length can be done to keep the dog cleaner.
|
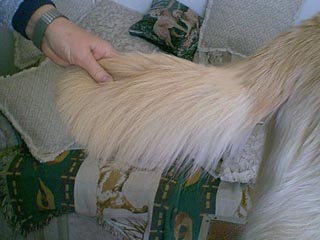
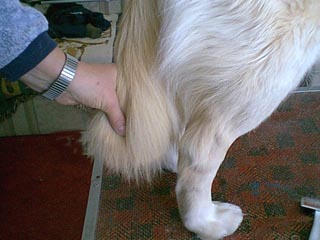 Brush
the tail thoroughly, making sure all traces of tangles or matts are
removed. Hold the tail down to the hock and place your thumb at the
point where the end of the tail meets the hock to mark the length you will
trim the tail to match. Note: in the photo, an imaginary line drawn
from my thumb will just meet the top of the dogs hock.
Brush
the tail thoroughly, making sure all traces of tangles or matts are
removed. Hold the tail down to the hock and place your thumb at the
point where the end of the tail meets the hock to mark the length you will
trim the tail to match. Note: in the photo, an imaginary line drawn
from my thumb will just meet the top of the dogs hock.
This will be the final length of the tail.
Using the thinning shears, start trimming just past that point, giving yourself
some leeway, especially if you are a beginner.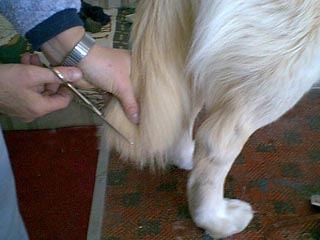
 Lift the tail and begin thinning, rounding the length of the tail feathering
slightly as you go toward the base. The dog in the illustration had
his tail trimmed not that many weeks prior to the photo, so you need to
look closely to see that I am trimming about 1" of feathering off.
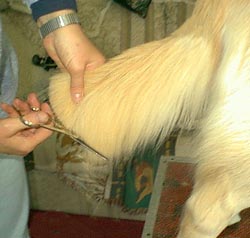
On the majority of dogs, especially if having never had their tails trimmed
before, you will have quite a ragged edge of sometimes quite lengthy feathering,
often much longer at the tip, and also very long at the point in this photo
that my thinning shear is just beginning to come to. I make the initial
cut of length this way, then come back, moving side to side across the tail
breadth, making light and fleeting cuts to blend up the sides of the tail,
so blunt cuts are not glaring at you. More extreme length of the feathering
at the tails' base, should be trimmed a little also, this particular dog
does not have an abundance of tail feathering or coat at this time.
Lift the tail and begin thinning, rounding the length of the tail feathering
slightly as you go toward the base. The dog in the illustration had
his tail trimmed not that many weeks prior to the photo, so you need to
look closely to see that I am trimming about 1" of feathering off.
On the majority of dogs, especially if having never had their tails trimmed
before, you will have quite a ragged edge of sometimes quite lengthy feathering,
often much longer at the tip, and also very long at the point in this photo
that my thinning shear is just beginning to come to. I make the initial
cut of length this way, then come back, moving side to side across the tail
breadth, making light and fleeting cuts to blend up the sides of the tail,
so blunt cuts are not glaring at you. More extreme length of the feathering
at the tails' base, should be trimmed a little also, this particular dog
does not have an abundance of tail feathering or coat at this time.
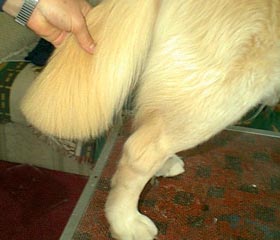
The final two photos below, show the finished tail. I also do some rounding
and blending very carefully at the very tip of the tail, so that when the
tail is hanging naturally down, it doesn't look like someone cut it straight
off with a blunt knife.
ANOTHER SIMPLE WAY to groom the length of the tail is to twirl, or wind the
feathering of the last 5 or 6 inches of the tail around the tail tightly toward
the tip, then hold it tightly with one hand. Bring your thumb and forefinger to
tip of tail still holding the wound feathering tightly, so that you can feel the
end bone of the tail. Use your thinning sheers to cut the feathering straight
off, within about 1" of the tip of the bone/end of tail. Without letting go of
the trimmed tail, but dropping your hold down about an inch or slightly more,
begin using the thinners to trim the tail so that it looks like a half of a
pom-pom, by angling cuts from the sides to the center, leaving the pom-pom a
little "higher" in the center, i.e. a nice ROUND shaped tip of tail. When you
have accomplished that, you may drop and shake out the tail and it is
unlikely that any further trimming will be necessary.
|
SHOULDERS ETC.
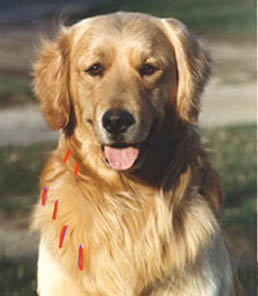 The thinning shears are also used, inserting the blade underneath the coat
and "into" or "with" the direction of coat growth as in the red lines
shown on the photo. A small amount of trimming is done under
the ear on the neck area and under the dogs chin where the two red lines
are above.
The thinning shears are also used, inserting the blade underneath the coat
and "into" or "with" the direction of coat growth as in the red lines
shown on the photo. A small amount of trimming is done under
the ear on the neck area and under the dogs chin where the two red lines
are above.
Following the line of the shoulder, if a heavy "shelf" exists as shown in
photo, careful thinning of undercoat in the direction shown by
the arrows, and combing out, will blend the coat in and reduce the heavy or
"over-loaded" look to shoulders and neck. Groom over a period of several
days
and "Stop, look, assess" as we did when doing the ears.
On some dogs, similar thinning at the base of neck at the withers is also
necessary.
Note: topcoat is NOT
removed in any of these area's, we are just thinning undercoat to remove some
bulk.
Over zealous grooming in
these areas, whether done with thinning shears, or a stripping knife will
not preserve the natural look of the dog, nor will it enhance the dog or cover
up lessor qualities. The dog should not have an "hourglass" look
when looking straight at the front when done grooming.
|
|
 GROOMING YOUR GOLDEN ~ THE TAIL & SHOULDERS