|
Unless you have a dog with very heavily coated ears
inside, you will only need to make one "light" stroke with the
thinning shears here, at most one stroke this direction, and one stroke
close to the skin under the coat going the opposite direction (towards
the dogs nose). |

|
Notice, by looking at your dogs ear, that the hair
naturally grows longer at the top, and shorter towards the tip.
When trimming the hair, we want to neaten and shorten,
but in essence keep the "natural effect". Take too much
off, and again you will change the "soft" facial expression of your
Golden, to a very unbecoming "hard" look.
|
So with that in mind, as a beginner, do this trimming
in small increments over a period of several days, in which time
you have the opportunity to look at your progress, without having
"butchered" the dog.
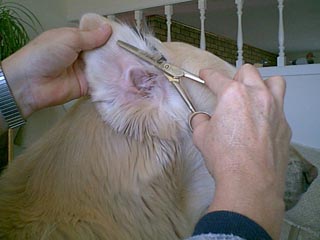
In this photo, notice the angle that the thinning
shears are being held in relation to the long hair on top of the
ear held between my fingers. The thinning shears are held
so the cut will be shorter at the tip of the ear (lower hand), and
longer at the top of ear ( the actual base of ear).
First use the thinning shears underneath the longer
hair on the top 3rd of the ear, close to the skin, and make a couple
of strokes with the thinning shears vertically across the
width of the ear, and comb.
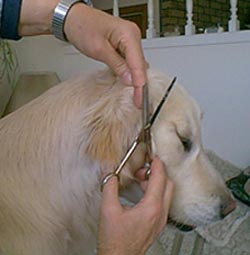
Secondly: trim the length of the hair on the
ear with the thinning shears as in the picture above, but do so
only about 1/4" (or less) at a time; comb out, look and then do a little
more. This is the most critical part of grooming the ear, so
work slowly, stop and look at it for a day, then do a little more if necessary.
Note: The few Long curls that run the length
of the front rim of the ear, take very little thinning
and trimming. If you cut this short, again you will spoil the
soft expression of your dogs face.
This specific problem is not shown in picture
form: I use the thinning shears close to the skin, going
vertically up under these hairs, and trim ONE stroke or thinning cut
only. Comb or brush it out, and don't be surprised that you
didn't take much out...that is what we want! Then brush or
comb these "decorative face framing hairs" straight out from the
ear, and angle your thinning shears so you trim closer (shorter) at
the tip of the ear and yet leave these hairs longer at the top or base
of the ear by the eye, just as it grows naturally. Truly, I do
very little here, for the reason I've said, and these decorative hairs
will lay down and look neat with very little trouble.
|
WHISKERS:
Goldens may be shown "with" whiskers, and of course
their whiskers are of great importance in hunting and other performance
activities, so it is entirely up to you whether you wish to trim them,
or leave them on. Or, you may do a combination of trimming only
the crooked or heavy whiskers, and leaving the finer ones. If I were
not showing the dog, I definitely would not trim them.
If you choose to trim whiskers, I prefer to do so
with a small blunt nosed scissors. Facing the dog, holding
the muzzle with one hand, and using one finger to pull the flews slightly
towards you will make the whiskers stand straight out. The dog
cannot "hide them" with this method! Then you use your blunt
nosed scissors, very close to the skin and being very careful to go
under the short hair of the face, trim the whiskers
from the back toward the front, each individually. Really good
lighting, or daylight is needed to see what you are doing.
The very fine whiskers around the nose, and
under the chin are also trimmed, but these may be trimmed carefully
with your regular straight shears if your dog is steady, otherwise
continue to use your blunt end scissors. These whiskers can be
trimmed straight across and even with the coat (without doing individually).
Trim the whiskers along the lip line as well as by the throat, eyebrows,
and on the cheek near the ear. |

