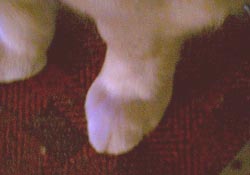
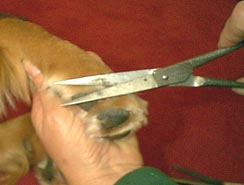
This photo is showing
the perpendicular final trim on the fuzz over the toenails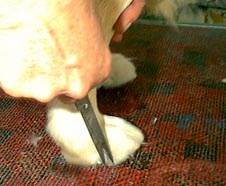 of both the front & back feet. You may use either the straight
blade shear, or the thinning shears for this, but I suggest the thinning
shears until you are well practiced. Do not lay the shears in toward
the foot when doing this, keep them coming straight up from the table.
This must be done with the dog standing. The thinning shears may be
used with rapid-consecutive cuts (held perpendicular to table) as shown above,
around the general shape of the toes (outside edge of front & rear feet).
of both the front & back feet. You may use either the straight
blade shear, or the thinning shears for this, but I suggest the thinning
shears until you are well practiced. Do not lay the shears in toward
the foot when doing this, keep them coming straight up from the table.
This must be done with the dog standing. The thinning shears may be
used with rapid-consecutive cuts (held perpendicular to table) as shown above,
around the general shape of the toes (outside edge of front & rear feet). |
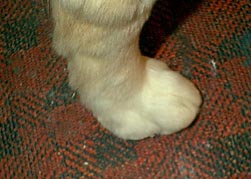
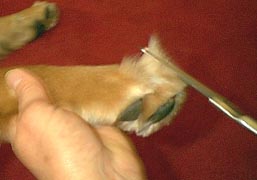
This is the
final trim around the feet, front & back, with the dog standing on the
table.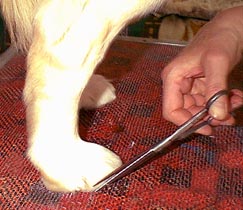 The tip and bottom blade of your straight shears should be resting
on the table. When trimming around the nails, depending on
the type of foot the dog has, I may decide to trim more away from the toenails,
to shorten the appearance of the toes, but in most cases, you do not want
to expose the toenails, and should not need to, especially on the
back feet. Just slide the shear along the nail to trim as shown.
The tip and bottom blade of your straight shears should be resting
on the table. When trimming around the nails, depending on
the type of foot the dog has, I may decide to trim more away from the toenails,
to shorten the appearance of the toes, but in most cases, you do not want
to expose the toenails, and should not need to, especially on the
back feet. Just slide the shear along the nail to trim as shown. |
|
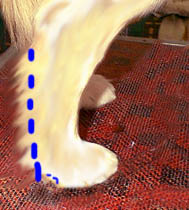
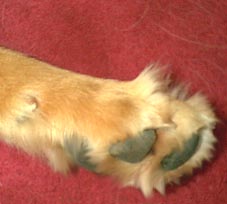
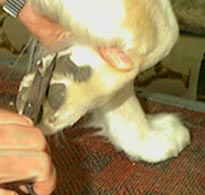
| Trimming the
hock is simple. Brush the hair out from the foot and hock. Using
your straight edge shears, make a vertical cut, perpendicular to the table
the total length of the hock, leaving the hair length at least
3/4" to 1" long at the back of the hock as an end result.
If the dog has an excess of hair, you may thin it a little with thinning
shears. The dotted blue lines in the photo give you an idea of where
to trim, then brush down, and neaten up at the back of the pad. You are neatening
up the "line", but you do not want to trim too short...note the actual hock
is a good distance away from my dotted line!
|
Nail trimming, is
easily done with a good quality Large Dog nail clipper, which I prefer over
the guillotine type clippers. Have some Quick Stop powder or other
styptic powder for stopping bleeding if you do accidentally cut too short.
If you don't have that, some cornstarch or baking soda will also work, just
pack it into the nail, and keep the dog quiet and out of water for
a few minutes. With the this photo as a guide, you are unlikely to
have an accident happen, if you trim a little at a time, and don't have a
dog that is jerking and trying to pull away. Do NOT yell at your dogs or
whack on them during your grooming sessions! Keep the sessions short,
talk calmly and authoritatively to them, insisting that they hold and "S
T A Y- Y" while you work on them, the give them lots of praise!
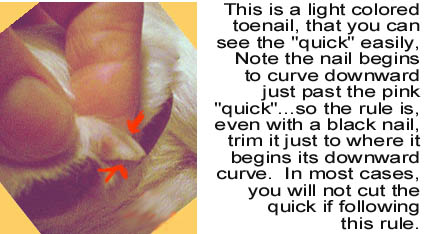
On some very overgrown
nails, you might also double check the length of the quick by
looking under the nails. If the nails are extremely over-grown,
you may have to trim a little at a time and often to get them shortened.
A nail grinder is also wonderful tool, and often I find that dogs that are
frightened, and fight having their nails trimmed with a regular hand trimmer,
are perfectly fine with the electric grinder!
The red arrows on the
photo show where you should make your final trim. Note: if
you are using grinders, do not grind for more than a couple of seconds
at a time on one nail, as the heat from grinder friction on the nail can
also be painful. Do a little at a time on all nails and take special
care not to catch the grinder in feathering or other hair!
Do not forget to trim
the Dew Claw, which sits higher on the inside of the front leg. If
this is not trimmed, it can literally turn and grow back into the dogs foot
and cause real problems.
|
| The next Grooming
Tutorial will cover trimming Shoulders and Tails. Navigation below |
|
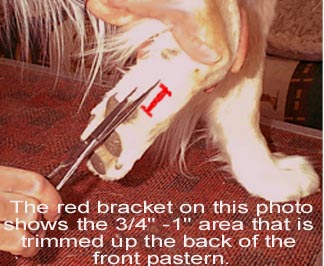 with straight shears: showing the trimming of the front pastern.
I prefer using the 3/4" trim only, and of course you are trimming across
the width of the foot while doing this.
with straight shears: showing the trimming of the front pastern.
I prefer using the 3/4" trim only, and of course you are trimming across
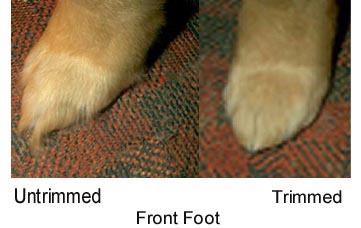
the width of the foot while doing this. GROOMING YOUR GOLDEN ~ THE FEET

 I had you push it down
through the toes and then trim it flat and even with the pads on the bottom
of the foot.
I had you push it down
through the toes and then trim it flat and even with the pads on the bottom
of the foot. 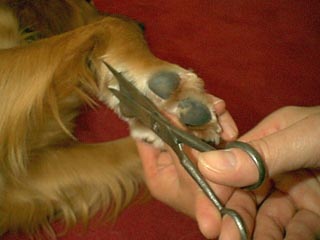 I am showing the angle of the straight shears held perpendicular
to (and actually laying on) the large pad on the front foot.
I am showing the angle of the straight shears held perpendicular
to (and actually laying on) the large pad on the front foot.
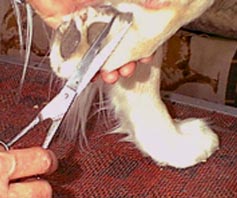
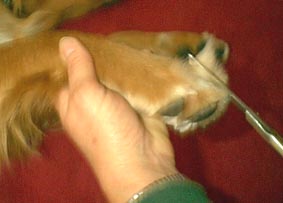
 you are still not satisfied because you still have "fuzz" on top of
the toes, pull the fuzzy hairs out away from the foot once again, and at
the outside edge of the fuzz, angle your thinning shears so they
will make the cut closer (or shorter) near the toenail, and longer near the
top of the toe as shown in this photo. Thin one stroke or cut
at a time, brush the foot and look, with the dog standing on it;
this should take no more than 1 very light thinning cut, possibly two.
you are still not satisfied because you still have "fuzz" on top of
the toes, pull the fuzzy hairs out away from the foot once again, and at
the outside edge of the fuzz, angle your thinning shears so they
will make the cut closer (or shorter) near the toenail, and longer near the
top of the toe as shown in this photo. Thin one stroke or cut
at a time, brush the foot and look, with the dog standing on it;
this should take no more than 1 very light thinning cut, possibly two.